

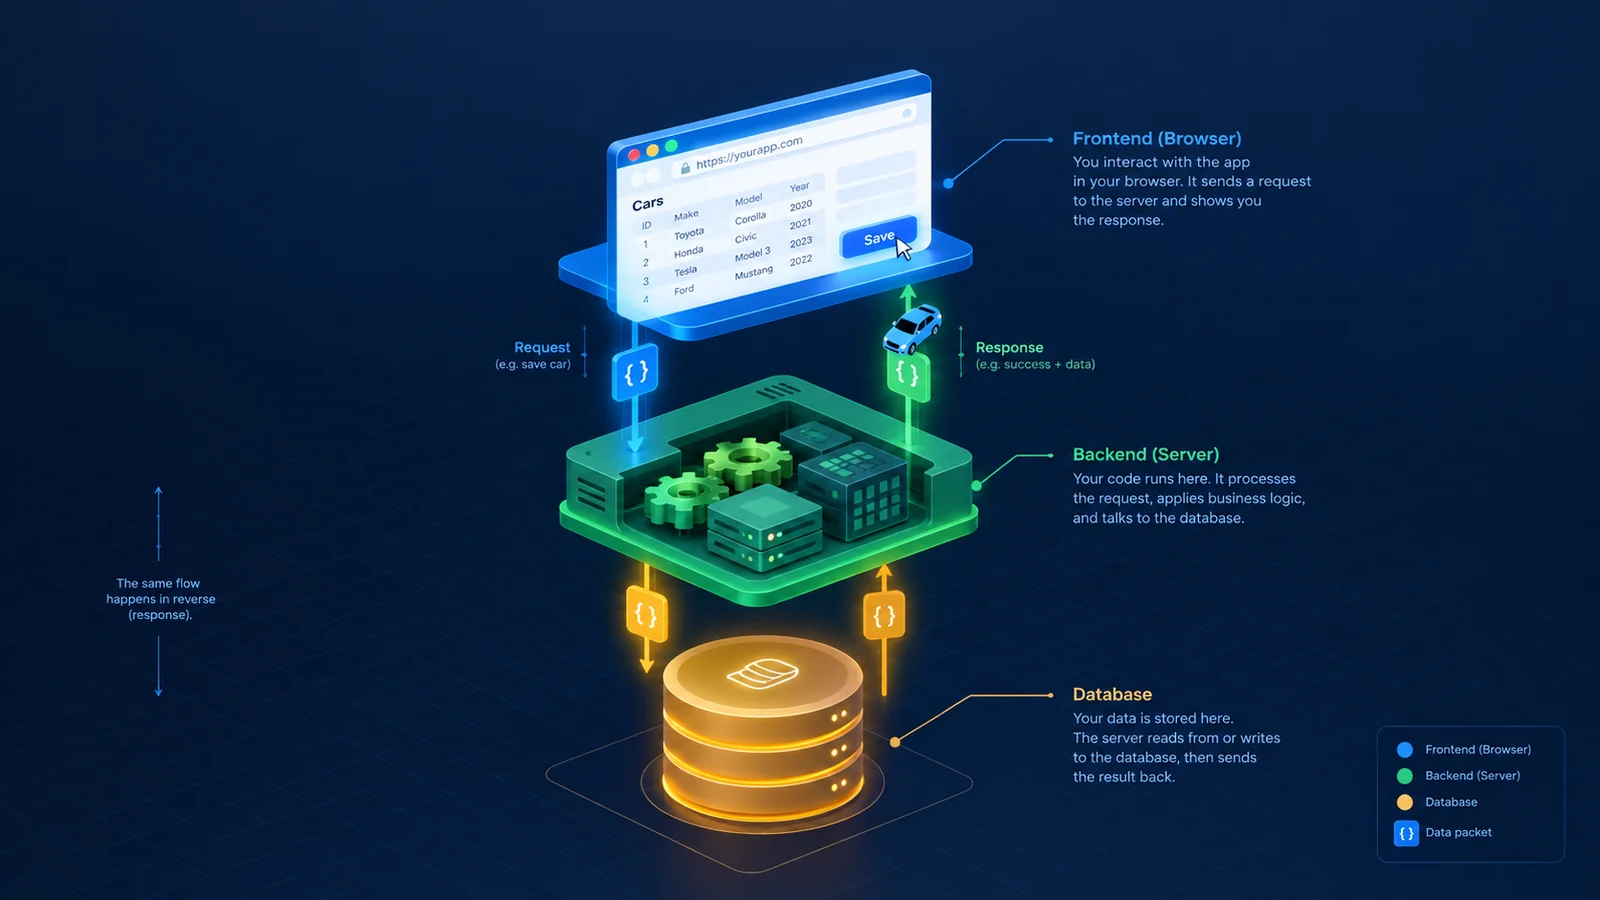
When you start learning web development, "full stack" can feel like a pile of unrelated tools: React, Java, Spring, SQL, JSON, HTTP. Each tutorial teaches one piece, and it is hard to see how they connect.
The best way I have found to understand it is to pick one small action, such as clicking a "Save" button, and follow it all the way through the system and back. That is what this article does.
The example is a car inventory app I built while working through Juha Hinkula's Full Stack Development with Spring Boot and React. It shows a list of cars, lets you add new ones and lets you delete them. That sounds simple, and it is, which is exactly why it is a good specimen to take apart.
Get the code: the full project is on GitHub at felixmakinda/fullstack-springboot-react. The backend is in
cardatabase/and the frontend incarfront/. The project keeps growing, so if you want the exact version this article walks through, use this snapshot.
The three layers#
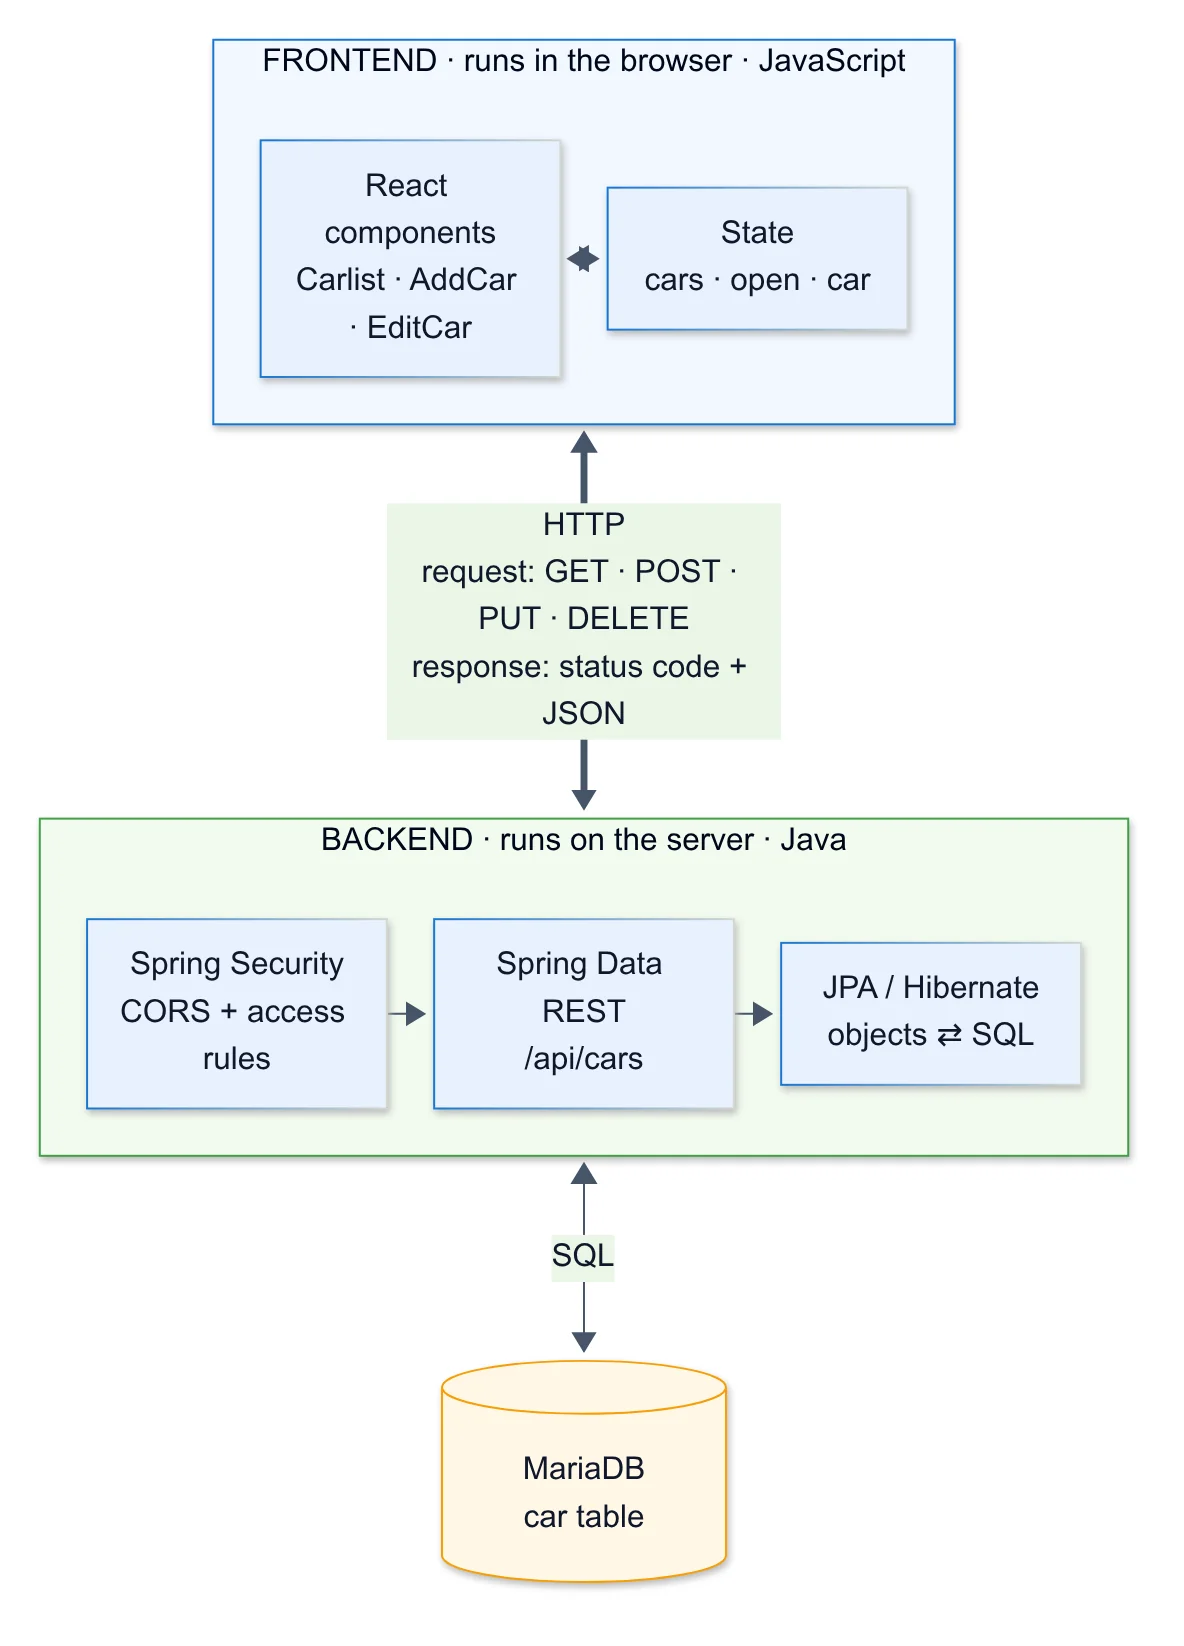
Every full-stack app in this style has three layers, and each one runs in a different place:
| Layer | What it is here | Where it runs | Its job |
|---|---|---|---|
| Frontend | React (JavaScript) | In the user's browser | Draw the screen and react to clicks |
| Backend | Spring Boot (Java) | On a server | Enforce the rules and talk to the database |
| Database | MariaDB | On a server | Store the data permanently |
The frontend and backend are two separate programs. They do not share code, variables or even a programming language. The only thing they share is a conversation over HTTP, carrying data written in JSON. That conversation has a name: the API (application programming interface).
Why JavaScript on the front and Java on the back? Because the frontend runs inside the user's browser, and browsers only run JavaScript. The backend runs on a machine you control, so it can be written in any language. Neither side cares what the other is made of, as long as they agree on HTTP and JSON.
A few words you need first#
HTTP is how browsers and servers talk. Every exchange is a request (from the browser) followed by a response (from the server). A request has a method, which says what you want to do:
| You want to... | HTTP method | URL in this app |
|---|---|---|
| List all cars | GET | /api/cars |
| Add a car | POST | /api/cars |
| Change a car | PUT | /api/cars/1 |
| Delete a car | DELETE | /api/cars/1 |
A response has a status code, which says how it went: 200 OK, 201 Created, 404 Not Found, 500 Internal Server Error. Anything in the 200s means success.
JSON is the text format the data travels in. A car looks like this:
{ "brand": "Subaru", "model": "Impreza", "color": "White", "year": 2014, "price": 12000 }
REST is a style of API where URLs name things (/api/cars, /api/cars/1) and HTTP methods say what to do with them, exactly like the table above.
The backend: a whole API from three small pieces#
Here is the surprising part. The backend for this app has no code that says "when someone sends GET /api/cars, fetch the cars". It is assembled from three small pieces, and Spring Boot builds the rest.
1. An entity class describes one row of the database table.
@Entity
public class Car {
    @Id
    @GeneratedValue(strategy = GenerationType.AUTO)
    private long id;

    private String brand, model, color, registerNumber;
    private int price;

    @Column(name = "car-year") // "year" is an SQL keyword, so the column gets another name
    private int year;

    @ManyToOne(fetch = FetchType.LAZY)
    @JoinColumn(name = "owner")
    private Owner owner;

    // constructors, getters and setters
}
@Entity tells JPA (Java's standard for saving objects to databases) that each Car object is a row in a car table. Hibernate, the JPA implementation Spring Boot uses, writes the SQL for you. You never type insert into car yourself.
2. A repository interface describes what you can do with cars.
public interface CarRepository extends CrudRepository<Car, Long> {}
That one line gives you save, findAll, findById, deleteById and more. There is no body, because Spring generates the implementation when the app starts.
3. Spring Data REST turns the repository into a REST API. With the spring-boot-starter-data-rest dependency and one setting:
spring.data.rest.basePath=/api
every repository becomes a set of endpoints. CarRepository becomes /api/cars, supporting GET, POST, PUT and DELETE. Here is what GET /api/cars returns, shortened to one car:
{
  "_embedded": {
    "cars": [
      {
        "_links": {
          "self": { "href": "http://localhost:8080/api/cars/1" },
          "owner": { "href": "http://localhost:8080/api/cars/1/owner" }
        },
        "brand": "Subaru",
        "model": "Impreza",
        "color": "White",
        "registerNumber": "KDH481G",
        "year": 2014,
        "price": 12000
      }
    ]
  }
}
Two details matter for the frontend. The cars are inside _embedded.cars, not at the top level. And each car carries its own address in _links.self.href. That link is how the frontend will later say "delete this car".
The frontend: components, state and fetch#
The frontend is built from React components: JavaScript functions that return what should appear on the screen. This app has three: Carlist (the table), AddCar (the "New Car" form) and EditCar (the edit form).
Two React ideas explain almost everything that follows:
- State is a component's memory, created with
useState. When state changes, React redraws the component automatically. You never show or hide things directly; you change state and the screen follows. - Props are values a parent component passes to a child, like arguments to a function.
To talk to the backend, the frontend uses fetch, a function built into every browser that sends an HTTP request. It is asynchronous: the page keeps working while it waits, and the code in .then(...) runs when the response arrives.
Now let's follow the three actions.
Action 1: Listing the cars#
You open the app in your browser. A table of cars appears. Here is everything that happened in between:
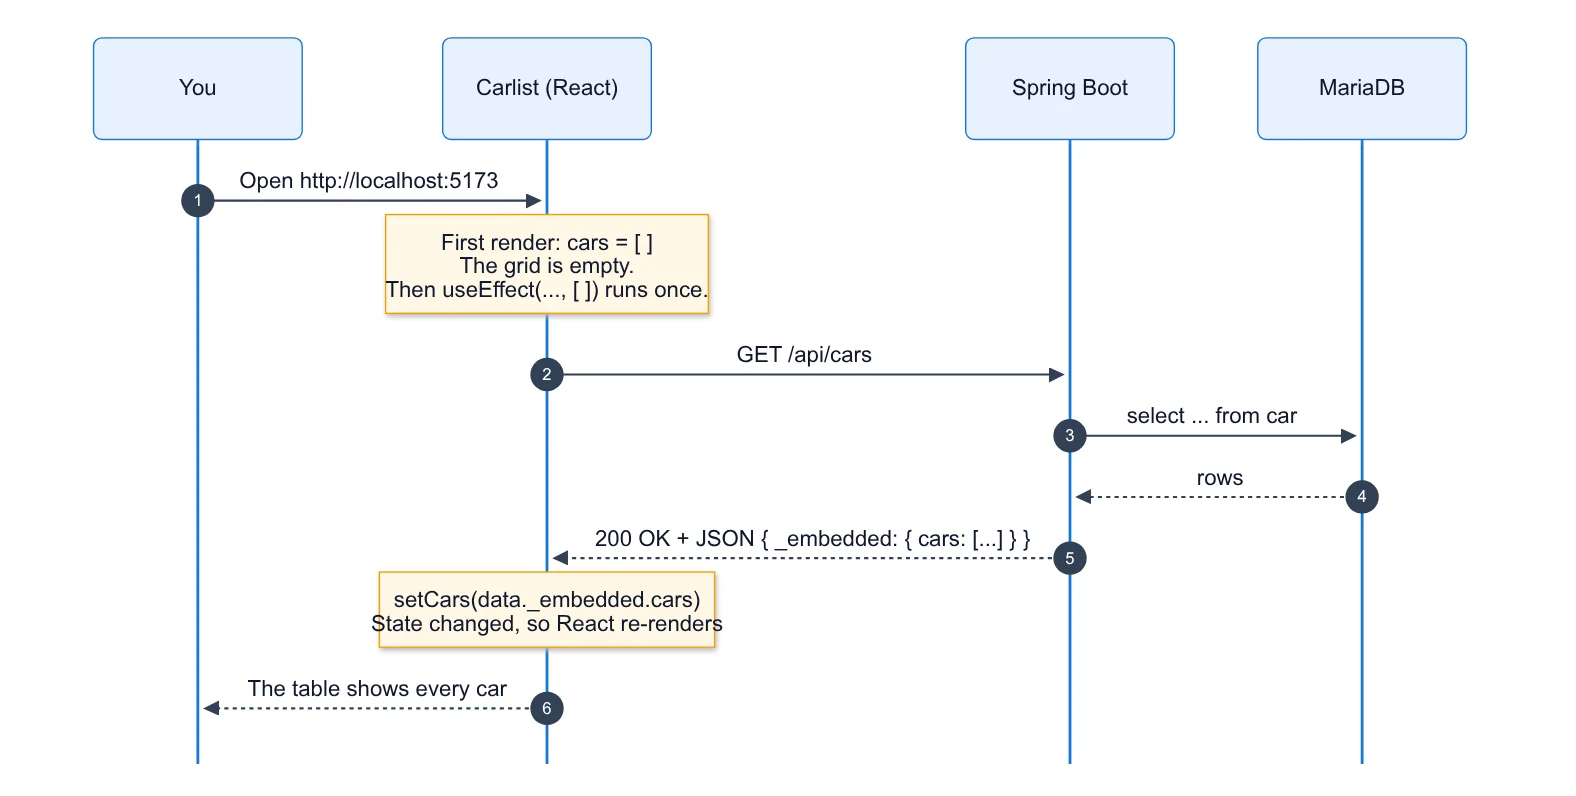
The code in Carlist:
const [cars, setCars] = useState([]);

const fetchCars = () => {
  fetch(SERVER_URL + "api/cars")
    .then((response) => response.json())
    .then((data) => setCars(data._embedded.cars))
    .catch((err) => console.error(err));
};

useEffect(() => {
  fetchCars();
}, []);
Read it in order:
useState([])startscarsas an empty list, so the very first time the table is drawn, it is empty.useEffect(..., [])runsfetchCarsonce, right after that first draw. The empty[]at the end means "only once". Without it, the effect would run after every redraw, fetching forever.fetchsendsGET /api/cars.response.json()turns the JSON text into a JavaScript object.setCars(data._embedded.cars)stores the cars in state. State changed, so React redraws, and this time the table has rows.
The table itself is an MUI DataGrid:
<DataGrid
  rows={cars}
  columns={columns}
  getRowId={(row) => row._links.self.href}
/>
getRowId tells the grid how to tell rows apart. The cars in the JSON have no id field, so we use each car's unique link instead.
Action 2: Adding a car#
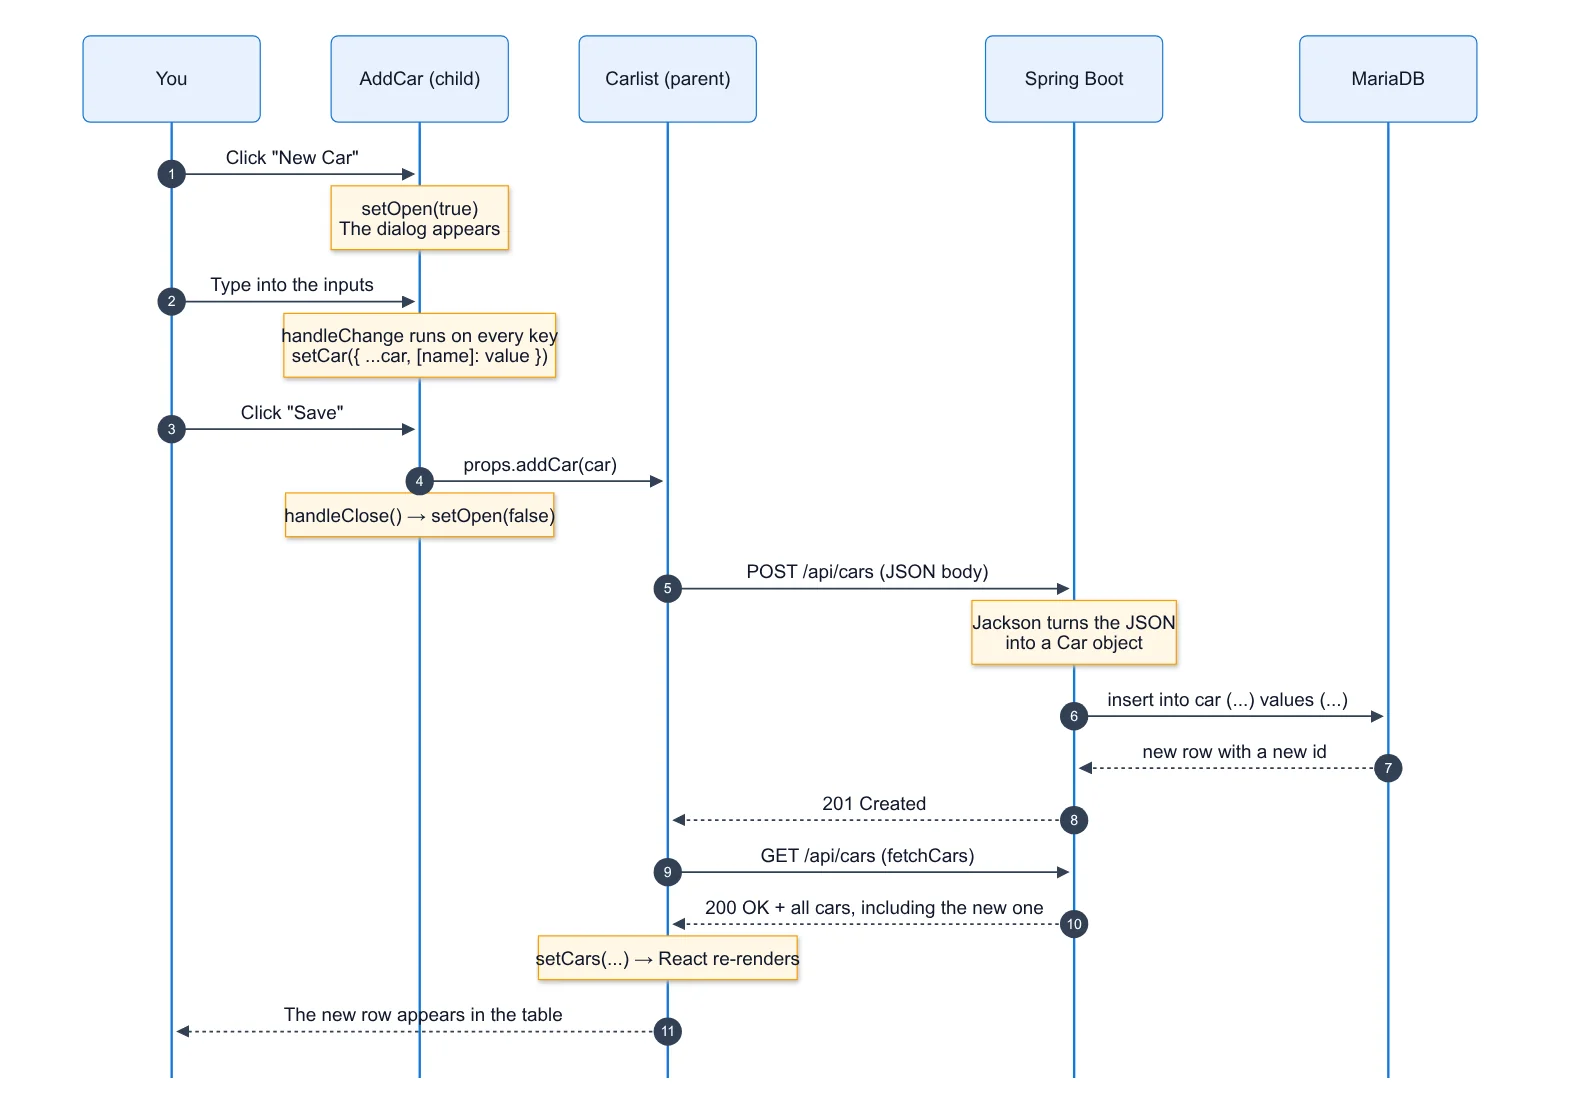
This is the longest journey, and the clearest view of the whole stack. You click New Car, fill in the form and click Save.
In the browser: collecting the form#
AddCar keeps two pieces of state: whether the dialog is open, and the car being typed.
const [open, setOpen] = useState(false);
const [car, setCar] = useState({
  brand: "", model: "", color: "", registerNumber: "", year: "", price: "",
});

const handleChange = (event) => {
  setCar({ ...car, [event.target.name]: event.target.value });
};
Each input looks like this:
<input placeholder="Brand" name="brand" value={car.brand} onChange={handleChange} />
Every keystroke calls handleChange. event.target.name is the input's name ("brand"), and event.target.value is what is in the box. ...car copies all the other fields, so only the field being typed in changes. The input always shows what is in state; React calls this a controlled input.
Handing the car to the parent#
When you click Save:
const handleSave = () => {
  props.addCar(car);
  handleClose();
};
Notice that AddCar does not talk to the server itself. Its parent, Carlist, owns the list of cars and the conversation with the backend, so it passes a function down as a prop:
<AddCar addCar={addCar} />
AddCar collects the input and calls that function. This split is a pattern you will see everywhere in React: data and server calls live in the parent, and children report back through functions they are given.
Sending the request#
const addCar = (car) => {
  fetch(SERVER_URL + "api/cars", {
    method: "POST",
    headers: { "Content-Type": "application/json" },
    body: JSON.stringify(car),
  })
    .then((response) => {
      if (response.ok) {
        fetchCars();
      } else {
        alert("Something went wrong!");
      }
    })
    .catch((err) => console.error(err));
};
method: "POST"means "create something new"."Content-Type": "application/json"tells the server what format the body is in.JSON.stringify(car)turns the JavaScript object into JSON text that can travel over the network.
On the server#
The request arrives at Spring Boot, and three things happen without a line of custom code:
- Spring Security checks whether the request is allowed. It also handles CORS, which I explain below.
- Jackson, a JSON library, reads the body and builds a
Carobject, matching"brand"tosetBrand(...),"registerNumber"tosetRegisterNumber(...), and so on. - Spring Data REST calls
CarRepository.save(car), and Hibernate turns that into SQL:
insert into car (brand, color, model, owner, price, register_number, `car-year`)
values (?, ?, ?, ?, ?, ?, ?)
MariaDB stores the row and gives it a new id. The server answers 201 Created.
Back in the browser#
response.ok is true for any status in the 200s, so fetchCars() runs. It is the same function from Action 1: another GET /api/cars, another setCars, another redraw, and your new car appears in the table.
Why fetch the whole list again instead of just adding the new car to the array? It is simpler, and the table is guaranteed to match what is really in the database. For a small list, that is a good trade.
Action 3: Deleting a car#
Each row has a Delete button. Clicking it starts a shorter trip, with one extra step that surprises most beginners.
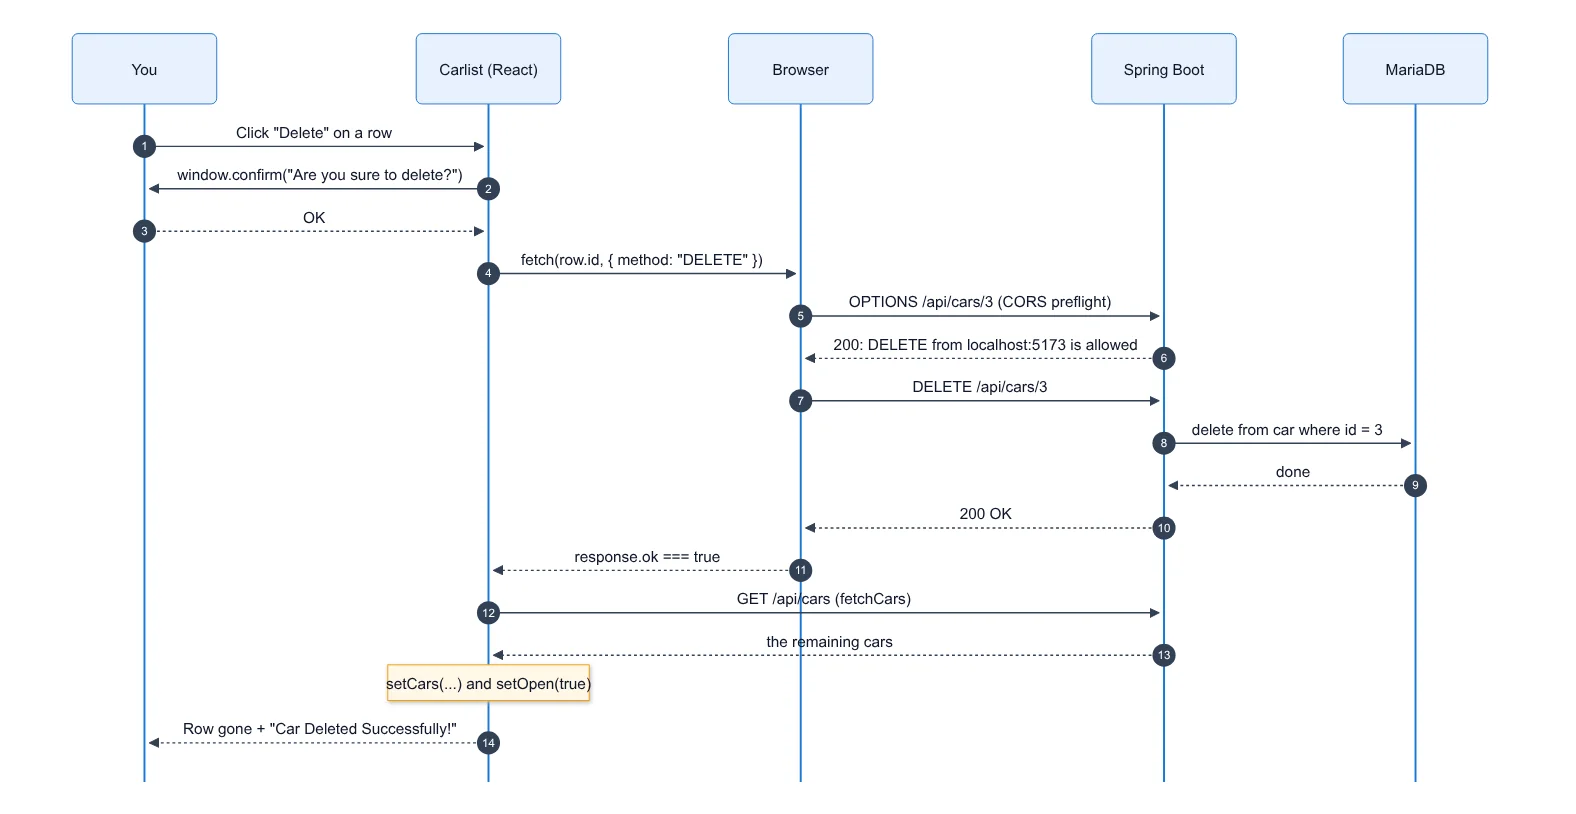
The button is rendered inside the grid:
renderCell: (row) => (
  <button onClick={() => onDelClick(row.id)}>Delete</button>
),
row.id is the value we chose with getRowId: the car's own link, such as http://localhost:8080/api/cars/3. That link is exactly the URL to send the DELETE to.
const onDelClick = (url) => {
  if (window.confirm("Are you sure to delete?")) {
    fetch(url, { method: "DELETE" })
      .then((response) => {
        if (response.ok) {
          fetchCars();
          setOpen(true);
        } else {
          alert("Sorry, something went wrong!");
        }
      })
      .catch((err) => console.error(err));
  }
};
setOpen(true) here controls a different piece of state: a small snackbar message saying "Car Deleted Successfully!".
The extra step: CORS#
Look at steps 5 and 6 in the diagram. Before sending the DELETE, the browser sends an OPTIONS request on its own, called a preflight.
Here is why. The frontend is served from http://localhost:5173 and the backend from http://localhost:8080. Different ports count as different origins, and browsers do not let a page from one origin freely change data on another. Imagine any website you visit being able to send DELETE requests to your bank. So the browser asks the server first: "Will you accept a DELETE from localhost:5173?"
The backend answers using its CORS configuration (slightly shortened here):
@Bean
CorsConfigurationSource corsConfigurationSource() {
    UrlBasedCorsConfigurationSource source = new UrlBasedCorsConfigurationSource();
    CorsConfiguration config = new CorsConfiguration();
    config.setAllowedOrigins(Arrays.asList("*"));
    config.setAllowedMethods(Arrays.asList("*"));
    config.setAllowedHeaders(Arrays.asList("*"));
    source.registerCorsConfiguration("/**", config);
    return source;
}
"*" means "anyone", which is fine while learning on your own machine. In a real deployment you would list your frontend's actual address instead.
Two things to remember about CORS:
- It is enforced by the browser, not the server. Tools like Postman and
curlignore it completely, which is why a request can work in Postman and fail in your app. - A failed CORS check shows up in the browser console, not as a status code your code can read. If
fetchfails mysteriously with a "CORS" message, the fix is on the server.
Editing: the same trip with a different method#
Editing a car follows the Add journey almost step for step. The differences are small:
- The form opens pre-filled with the row's values.
- The request uses
PUTto the car's own link (/api/cars/1) instead ofPOSTto/api/cars. - The server answers
200 OKinstead of201 Created.
Once you understand Add, you already understand Edit.
A note on security#
If you look closely at this app's backend, every endpoint is currently open to anyone. That is deliberate: it lets you build the screens first without logging in every time. The next step is to switch on login with JWT (JSON Web Tokens): the user logs in once, the server hands back a signed token, and the frontend attaches that token to every request in an Authorization header. Every arrow in the diagrams above stays the same; each request just carries one more header.
What to take away#
- A full-stack app is separate programs talking over HTTP. The browser runs JavaScript, the server runs Java (or anything else), and JSON is the shared language.
- REST maps actions to methods:
GETto read,POSTto create,PUTto update,DELETEto remove. - In React, state drives the screen. Change state with
setCars,setOpenorsetCar, and React redraws to match. - Parents own data; children report back through props.
AddCarcollects the form, andCarlisttalks to the server. - Spring Boot writes most of the backend for you. An entity, a one-line repository and Spring Data REST give you a complete API, and Hibernate writes the SQL.
- Check
response.ok.fetchonly fails on network problems. A404or500still counts as a response, so you have to check for it yourself. - CORS is the browser protecting users. When the frontend and backend live at different addresses, the server has to say who is allowed in.
Next time you click "Save" on any website, you will know there is a little relay race behind it: state, props, fetch, HTTP, JSON, Java, SQL, and all the way back again.
Run it yourself#
The best way to make this stick is to run the app and watch the requests happen. You will need Java, Node.js with pnpm, and a MariaDB server with a cardb database; the connection settings live in cardatabase/src/main/resources/application.properties, with the password read from a DB_PASSWORD environment variable. Clone the repository (snapshot matching this article), start the backend in cardatabase/ with ./mvnw spring-boot:run and the frontend in carfront/ with pnpm install and pnpm dev, then open your browser's developer tools on the Network tab. Every arrow in the diagrams above appears there as a real request, with its method, status code and JSON.